How to effectively reduce the image shaking or jelly effect caused by idling or car vibrations in dashcam footage?
Image stabilization and vibration reduction for dash cam videos
Installing a dash cam in a vehicle introduces the challenge of dealing with different levels of vibrations caused by various idling or suspension characteristics. While software-based stabilization methods can help to some extent, they may not be sufficient to handle excessive vibrations. In such cases, using hardware solutions becomes the most effective and economical approach to combat the vibrations.
Jello Effect
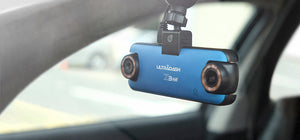
Our dual-lens dashcam UltraDash Z3+ is equipped with a telephoto lens, and even slight vibrations can cause significant shaking. This phenomenon is commonly known as the "jello effect," where the image appears skewed or distorted when capturing high-speed or vibrating objects using an electronic shutter on a CMOS sensor.
However, it is normal for telephoto lenses to be more susceptible to vibrations. For instance, you can try using your smartphone camera and zoom in as much as possible. You will notice that even slight vibrations result in significant shaking. But today, I'm here to guide you on how to minimize the issue of vibrations as much as possible!

How to effectively solve the vibration issue?
First, prepare a 20mm hex wrench and some Tack-it adhesive. In fact, by using the hex wrench to securely tighten the bracket, most of the vibrations can be resolved. Therefore, those who are concerned about the product's appearance can skip using the Tack-it adhesive clay.


Using Tack-it adhesive eco-friendly clay for vibration absorption
The technique of using Tack-it adhesive clay for vibration absorption was actually suggested by our users. If you are aiming for a more perfect telephoto lens image effect, Tack-it adhesive eco-friendly clay with its soft and elastic properties can absorb finer vibrations, resulting in a more optimal shooting outcome. To begin, knead the purchased Tack-it adhesive eco-friendly clay into a ball.

Next, completely cover the clay over the bracket, ensuring that the clay fully reinforces the bracket. The size of the clay can be adjusted as per your preference. In our demonstration, we used a relatively larger amount to cover the entire bracket. However, eco-friendly clay is very affordable, and we recommend purchasing "Tack-it adhesive by Faber-Castell" from online platforms like Amazon or stationery stores. You can shape the clay as desired for aesthetic purposes.


The ultimate reinforcement against vibrations is now complete
I understand that using eco-friendly clay may seem a bit unconventional. So, if appearance is a concern, using a size 20mm hex wrench will still yield excellent results. The mention of eco-friendly clay is to share the ingenious solution contributed by our users. The reduction in vibrations is truly remarkable, and I couldn't help but share such a great method with everyone.


Learn more:
UltraDash C1. The Best Value For Your Money
7 Reasons Why you need a Dash Cam
7 Easy Steps to Install a Dash Cam Yourself
How to Hardwire Dash Cam Installation Guide Step-by-step
The 5 Myths of Wi-Fi Function on Dash Cams
How to Use OTG Device with Phone to Watch, Edit and Share Dash Cam Footage
Four Factors that Affect GPS Logger Positioning Quality of Dash Cams
Five Key Points of Choosing a Dash cam for Ridesharing Taxi, Uber and Lyft Driver
Five Simple Ways To Troubleshoot Common Dashcam Glitches
Does TESLA need an additional dash cam?
Easy Installation Of 3M Adhesive Dash Cam Bracket + Static Side Film
How to Reduce Jello Effect Caused by Car Vibrations in The Footage Recorded by A Dash Cam?